This Quick Start Guide will step you through modifying your default layout by adding a new tab, column and channels. After completing this guide you will understand how to adapt your layout to best fit your needs. Please follow the step-by-step instructions below.
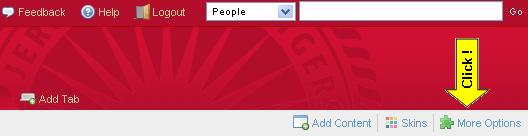
Navigate to the User Preferences channel by clicking on the More Options link in the portal navigation bar.
Click on the "Add New Tab" button

Add the desired name for the new tab - Select a position - Click "Submit" button.

Activate the User Preferences screen for new tab by clicking the tab label in the Layout Summary.

Add a new channel by clicking on the "Add Channel" button.

Select a desired channel to add to the layout.


Click on the "Add Column" button to add a new column.

Set Column Widths to 50% and click on the "Summit" button.

Add a new channel to the new column by following steps 5 & 6.


Add another channel to the layout in the right column by following steps 5 & 6.


Move the channel to another position by clicking the active arrow icons.

Result of actions taken in this step:

Click on the "Close" link to restore the "Tabs View."

The result of adding a new tab called "test," new columns, and new channels. Please feel free to customize your layout anyway you like.

This is the end of the Quick Start Guide. You can help us improve myRutgers by submitting your ideas through the Feedback channel.