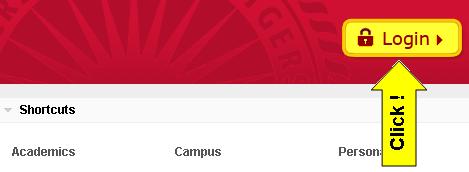
Go to the myRutgers welcome screen located at https://my.rutgers.edu. On myRutgers welcome screen, click on the "Login" button.
You will then be redirected to Rutgers Central Authentication Service (CAS), where you will be required to input your NetID and password. If you have a student account (Eden, Pegasus) and a faculty/staff account (Andromeda, RCI), you must use your faculty/staff account password. At this point you need to click the "Login" button. Upon a successful login you will be redirected back to myRutgers.
When you enter myRutgers, you will start off with a standard set of services (channels) and the default scheme (tabs and column layout). Feel free to customize the channels, columns, and tabs in your personal layout. Your changes will be reflected as soon as you exit the "Options" screen. Also, myRutgers will automatically recognize your primary campus location and display channel content accordingly.
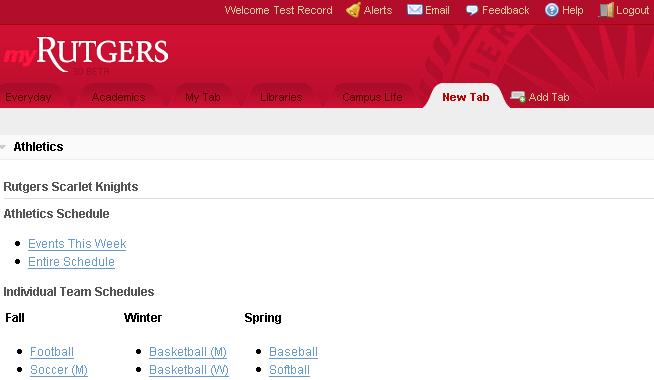
myRutgers is composed of a number of tabs or pages that can be used to organize the visual display. Each tab is divided into columns that contain channels of information. Tabs can be added, deleted, renamed and rearranged to suit your needs.
First, decide how you would like to organize your information and how many tabs you will use to do it. For example, you may want to place all of your academic information on one tab called "Academics" and all of your personal interests on another tab called "myTab".

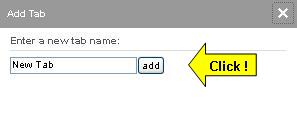
Enter a new tab name in the "Add Tab" dialogue and click "add" button.
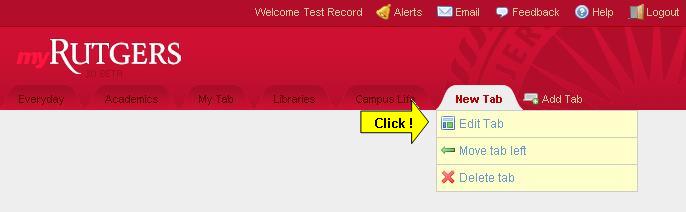
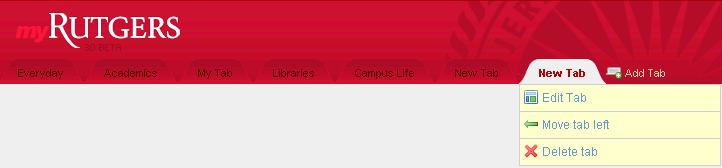
To change the tab name or tab layout, hover the mouse cursor over the newly created tab and click "Edit Tab" from the fly-out menu.
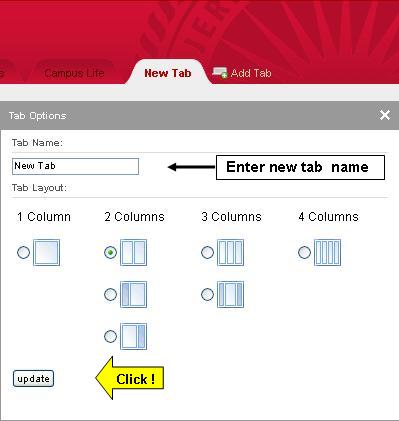
Enter the name you wish to give for new tab in "Tab Name" input box and choose a tab layout, then click "update" button.
To move the tab around, move the cursor to the "New Tab" we've just created and choose "Move tab left" or "Move tab right" from the drop down menu to place new tab to the desired position.
The new tab has been created and please refer to "Adding a channel" section in this document to add channels in the tab.
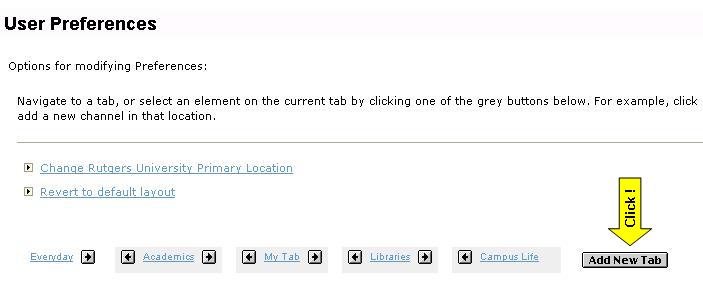
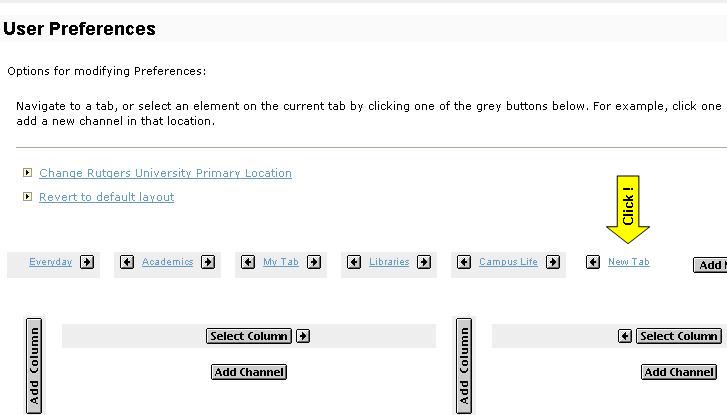
You should see your layout represented as below. This representation is often referred to
as your "Dialogue Area".
Click on the "Add New Tab" button.
Enter the name you wish to give the tab and select where it should be placed in relation to the other tabs. Then simply press the "Submit" button. Your new tab will appear in the position you chose.
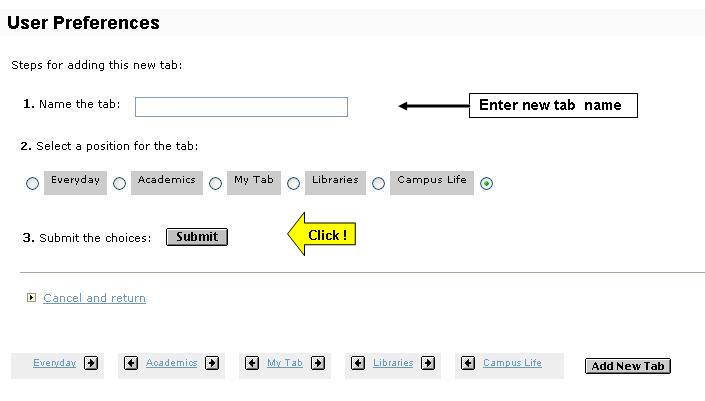
Your new tab will appear in the position you chose.

Any tab can be deleted, including those that come with the default setup. When a tab is deleted, all of the channels associated with that tab are also removed. However, these channels are still available through the "Add Content" menu.
To delete a tab:
The default active tab is the tab that is displayed when you first log-in to myRutgers. To make a tab your default active tab:
The new default active tab will be the first you see the next time you login to myRutgers.
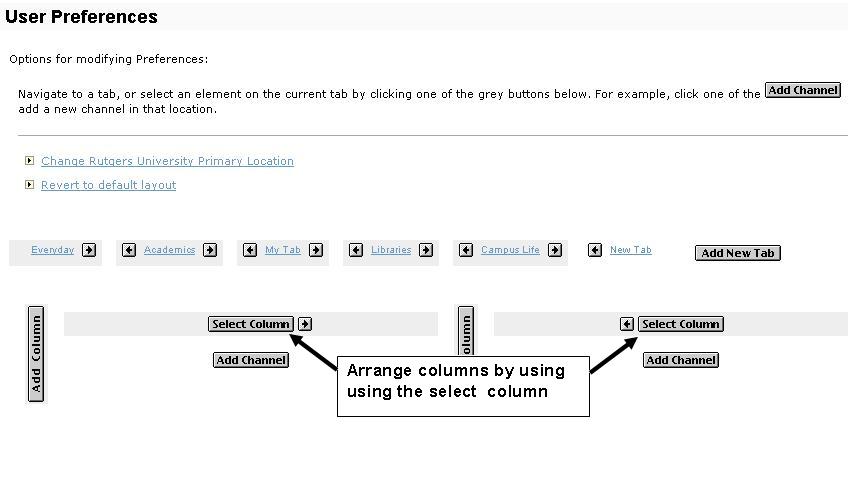
Each tab can contain one or more columns that organize the display of different information channels. In theory, the number of columns on a tab is limitless. However, it is a good idea to limit the number of columns to two or three, as channels will not display properly if the columns are too narrow.
The screen shown below is often referred as "Layout Summary".
In the "Layout Summary", you will see a button to the left and right of every existing column.
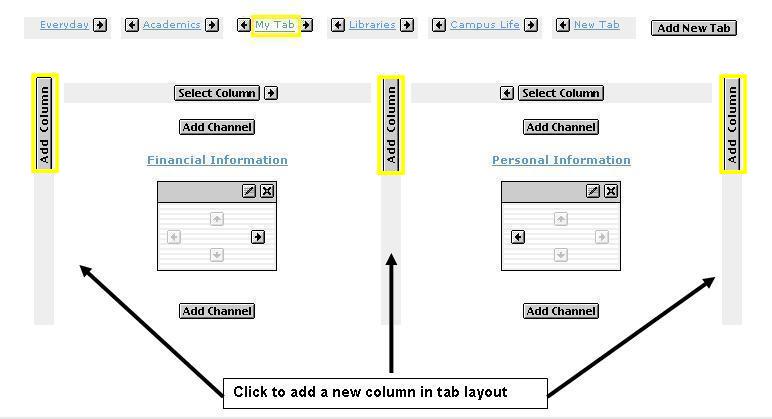
To add a new column, click on the "Add Column" button in the position that you want the column to appear.
You can rearrange the order of the columns by clicking on the arrow keys beside the "Select Column" button.
To delete a column, click on the "Select Column" button at the top of the column. Then choose delete in the associated dialogue area. All channels in that column will also be removed.
Channels are created by Rutgers University departments, faculties, services, and organizations, as well as select external content providers. These content providers are responsible for the content, availability, and maintenance of the channels they create. At this time, individuals cannot create channels for myRutgers unless they are part of a recognized Rutgers University group. However, if you have an idea for a myRutgers channel that would benefit the entire university community, and you have a working knowledge of JAVA, XML, and XSLT, please contact the myRutgers implementation team at ess-myrutgers@oit.rutgers.edu.
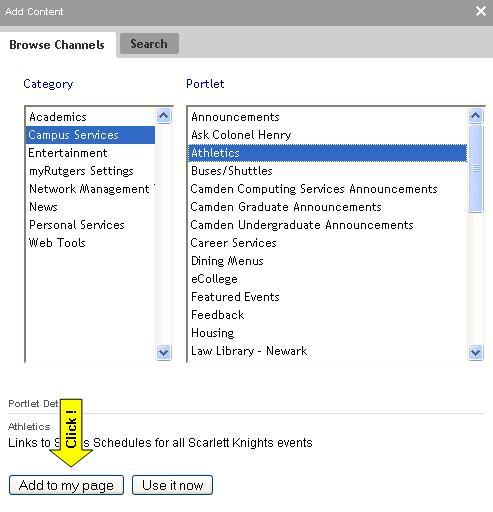
Select channel and click on the "Add to my page" button.
New channel will be added to the tab.
Click on "New Tab" or any available tabs.
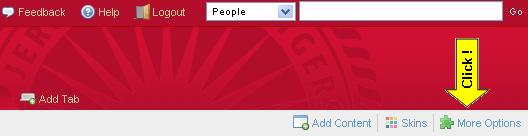
In the Layout Summary you will notice the "Add Channel" buttons in each of the columns of the page you want to customize. Click on the "Add Channel" button in the specific position where you'd like your new channel to appear.
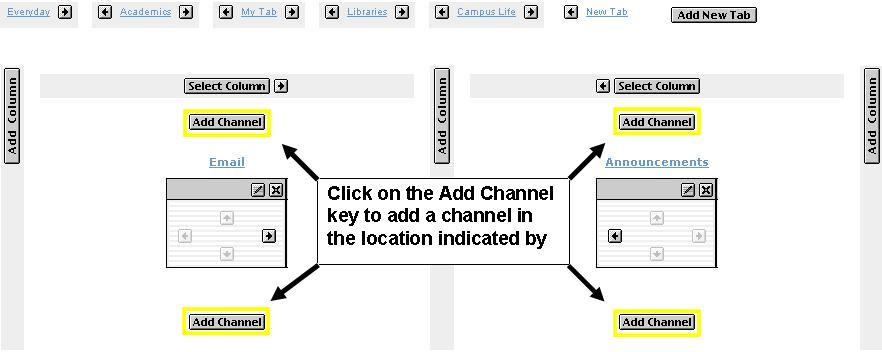
When you click on one of the "Add Channel" buttons, you will be taken to an "Add Channel Dialogue" area.
Select the category that the channel belongs in and press "go"; then select a specific channel from that category and press "Add Channel".
Click the "Close" link in the top right of the current window to return to the "Tabs View".
To rearrange channels:
Any channel can be removed, including those that come with the default setup. A channel is automatically removed when either the tab or the column that contains that channel is deleted. Channels can also be removed individually.
There are several "Control Icons" located at the top of each channel window. These control layout changes for the current session only, except for the "X" or "Remove" icon, which will permanently delete the channel. If you delete a channel, you can add the channel again by following the instructions in the "Adding a channel" section above. Here is a list of the different control buttons and their functions. Note that not all control icons are available for all channel windows.
| Symbol | Function | Explanation |
|---|---|---|
 |
Maximize | Display channel in full-screen mode. |
|
Remove | Removes the channel from the user's layout. |
|
Configure | Customize/modify the channel -- not available for all channels. |
|
Help | Specific channel help. |
|
About | Specific channel about. |
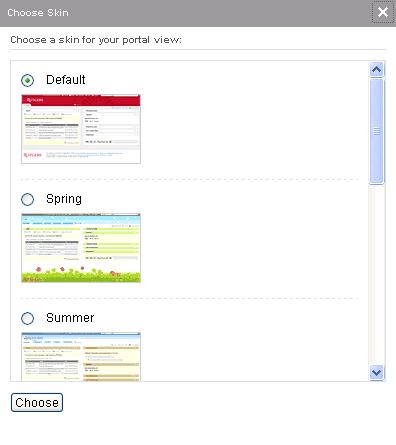
Skins are color variations on the presentational aspects of the channel window. This includes font, tab, channel styles and colors. You can choose your skin preference from the list available on the "Choose Skin" screen. This feature requires Javascript enabled in your web browser.
At first login you will be presented with your default skin. To change the look of myRutgers (requires Javascript enabled), please follow the steps below:
To use the myRutgers portal, you must have one of the following browsers with cookies enabled, pop-up allowed and Javascript enabled:
myRutgers uses the latest web technologies and will be upgraded continually to accommodate new features, so it is a good idea to use the most recent version of your browser. For non-mobile browsers, we recommend using Mozilla Firefox browser, which can be downloaded from http://www.mozilla.com/en-US/firefox/
You can download free upgrades for PCs at www.mozilla.org, www.microsoft.com and for MACs at http://www.apple.com/safari/.
For all actions myRutgers uses a secure (SSL) connection (https://). All of the traffic is encrypted using 128-bit encryption.
Users should always log out of their session due to the confidential personal data available via myRutgers. If you forget to log out from myRutgers, you will be automatically logged out after 1 hour of inactivity as a preventative measure. This is a security feature that helps to prevent others from gaining access to your private information. Remember: automatic timeout is NOT a substitute for logging out. The only way to make sure your information is secure is to exit using the "Logout" button after every session.
No. Your personal information on myRutgers can only be accessed using your NetID. For this reason, it is very important that you do not give your NetID password to anyone. No one (including support staff) needs to know your password, for any reason.
Because myRutgers gives you access to very confidential information, it is important that you log out after using myRutgers on a public computer. If you do not log out, the next person to use the computer will have access to your information. They can inflict damage by erasing your emails, copying your address book, or dropping courses from your schedule.
To ensure the security of your personal information, you should change your password regularly. Never give your password to anyone, and if you suspect that someone knows your login information, change your password immediately!
To change your NetID password, go to https://netid.rutgers.edu. This will also change your password for any central email accounts (Andromeda in Newark and ScarletMail).
For myRutgers to log into email you must have the password for both NetID and your email account. After you log in to myRutgers, myRutgers will connect to your corresponding email server and read your mail in the webmail summary channel. To read your mail, click on the Inbox button in the webmail summary channel.
If you want to change your mail host, click on "Configure" button on the top right corner in the webmail summary channel. If you are in your inbox, click the "Configure Preferences" link at the top right corner of the channel. It will take you to the webmail edit screen. Click on the "Change mail system" link and a list of available mail hosts at Rutgers. You will select the mail host from where you want to read your mail and click "Login". Note you must already have an account on the selected mail host and the password on that mail account must be the same as your NetID password.
Users who have multiple Rutgers email accounts (e.g. a student and staff email account) can view several accounts at the same time by adding another channel to your layout. After you have added another copy of the email channel, follow the instructions above to change the account of the second channel to your other email account.
Select the mail host where you want to read mail. Then in the text boxes enter your username and password and click "Login".
"My Calendars" channel is a read-only calendar aggregator, which allows a user to view built-in default calendars and add external iCal feeds for display. Built-in default calendars include Academic and US Holidays (for everyone), Course Schedule (for students) and University Staff Holidays (for staff). Users can also subscribe/unsubscribe to myRutgers built-in calendars, configure their time-zone preference and change the starting day for a day/week/month view period of their calendar events by using the mini-calendar widget. Calendar events are color-coded accordingly with their calendar sources and can be filtered from the display on demand.
It is important to note that this channel will not allow users to add events through its interface and it does not resolve conflicts between events. All events are retrieved and displayed in a list view.
If you want to add external calendars, click on the "Configure Preferences" link on the top right corner. Under "Edit Calendars" section, click on the "Add a calendar" link to enter the calendar name and the iCal address. After saving your configuration, your calendar will appear in the "My Calendars" list.
The calendar address must be the URL to the iCal version of the calendar. An iCal address will end in ".ics" and must begin with either "http" or "https" not webcal. For example, the calendar address for the Earth Seasons calendar from iCalShare is http://www.herskal.com/calendars/EarthSeasons.ics. The calendar must follow the iCal format requirements.
The calendar you are trying to add must be in an iCal format. If the calendar does not follow iCal format requirements, you will get "The calendar "XYZ" is currently unavailable." error message on the events listing view. Sometimes the calendar may also contain invalid characters that would lead to a parsing error. An easy way to tell if your calendar is of an iCal format is to check that the calendar address ends in ".ics". You may also get this error message if the calendar feed contains too many events to be retrieved successfully within the timeout period. You will still be subscribed to any invalid calendar but will not see any events from them until the errors have been resolved.
After maximize the events listing view, you can toggle the "Check" icon next to a calendar to add or remove the calendar from your filter list. Events from only those calendars you have selected will be shown. This selection will not be persisted between login sessions. You can always delete any calendar that have been added previously by clicking on the "Delete" icon next to each calendar under "My Calendars" section in the "Configure Preferences" view. Deleting a calendar will permanently remove it from your channel's preferences. Meanwhile, you cannot delete built-in calendars, but can only subscribe/unsubscribe to them by toggling the "Check" icon next to each calendar under "Built-in calendars" section in the "Configure Preferences" view.
Public calendar are available from iCalShare. Google calendars are also available to those with a Google account. Google Calendar allows you to create a calendar and add your own events. You can also search through public calendars and subscribe to them.
The mobile theme displays list for navigation instead of tabs and provides the read-only view of channels on a user's layout. It does not provide capability to customize your layout or configure channel preferences as it can be done when using a window browser. Exclusions From Mobile Support are:
The Email channel is available in mobile view. However, it only provides the preview feature, which includes up-to 10 latest messages in your Inbox and links to the webmail service and other email web tools directly. Refer to this FAQ for details on how to configure your mobile device to check Rutgers email directly. You may also switch to full view to access other features in the Email channel.
Mobile view will be rendered by default on a mobile browser. After logging into myRutgers, you may switch between mobile view and full view via the "Switch to Full View" or "Switch to Mobile View" link at the bottom of the page. You will be prompted to re-login for this change to take effect and your selection will be persisted until you switch your view again.
If you receive a server error message, please copy and forward the message to your campus Help Desk:
Camden -- http://computing.camden.rutgers.edu/
Newark -- http://help.newark.rutgers.edu/
New Brunswick/Piscataway -- http://www.nbcs.rutgers.edu/helpdesk/hdnew/
RBHS -- http://ist.rbhs.rutgers.edu/about_IST/contact_us01.shtml
Your opinions matter to us! Please use the Feedback channel to send your comments and suggestions regarding myRutgers. Upon a successful login, click on the "Feedback" icon/link located at the top portal page bar in the header to access this channel.
Click here for Frequently Asked Questions about myRutgers.
For a list of NBCS Frequently Asked Questions, please visit http://faq.rutgers.edu/